Capture From Camera
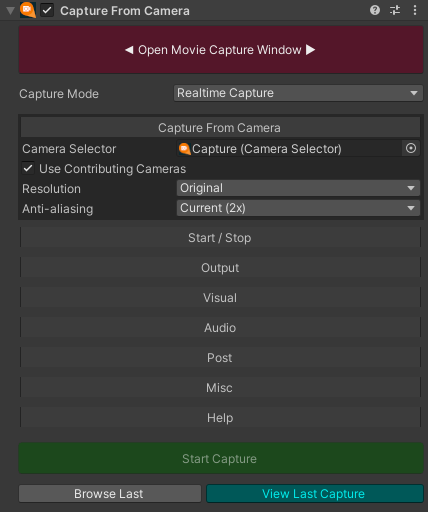
This component captures the rendering of a Unity camera (including post effects and uGUI). IMGUI is not captured (for this you have to use the CaptureFromScreen component). You can capture from a single camera, or from multiple cameras if you have several cameras in your scene that contribute to the final camera rendering.
This component allows you to render at a higher resolution than the app is running at, including 8K output (if the codec supports this resolution).
From Camera

Properties
| Property | Function |
|---|---|
| Camera Selector | Selects the camera to render from. Using the CameraSelector component allows easy switching between cameras. |
| Camera | Selects the camera to render from if only one camera is required. |
| Use Contributing Cameras | Whether to work out which others cameras are also contributing to the rendering (camera chaining) and render those as well |
| Resolution | The resolution of the final output (before downscale) |
| Anti-aliasing | Anti-aliasing to use during rendering |
| Include Scene View Gizmos | When capturing from the Scene View camera, whether to render the Gizmos |

- The "Open Movie Capture Window" button opens the in-editor capture window which allows capturing without adding components to your scene
Properties
| Property | Function |
|---|---|
| Capture Mode | Capture can either be realtime, or an offline render |
Start/Stop

Properties
| Property | Function |
|---|---|
| Toggle Key | Select a key to toggle the start and end of capturing |
| Start Mode | The capture can start either when the component starts, or wait until it is manually triggered by the user via scripting |
| Start Delay | An optional delay can be specified before the frame capturing actually starts |
| Stop Mode | Without a stop mode the capture will continue forever until it is stopped by the user or script. You can set a stop mode to make the capture stop when it reaches either a certain number of frames, or a duration in seconds |
Output
Properties
| Property | Function |
|---|---|
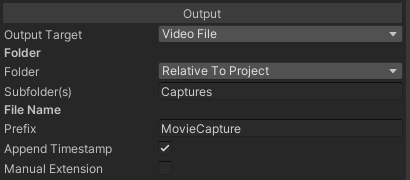
| Output Target | Select if you want to output to a video file, image sequence, or a named pipe |
| Folder | |
| Folder | Select the relative folder to output to |
| Subfolder(s) | Select a subfolder to output to |
| File Name | |
| Prefix | The start of the file name |
| Append Timestamp | Whether to append an auto-generated timestamp to the file name for videos |
| Manual Extension | Whether to manually specify an extension to the file name for videos |
| Image Sequence | |
| Format | The format of the image sequence (per-platform) |
| Start Frame | The number to start the frame count with for the file name |
| Zero Digits | The number to digits to use for the frame count in the file name |
| Named Pipe | |
| Pipe Path | The path of the pipe to write to (eg \\.\pipe\test_pipe) |
Visual
Properties
| Property | Function |
|---|---|
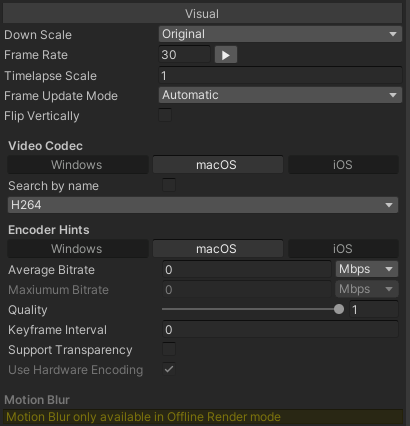
| Down Scale | Reduce the resolution of the final output |
| Frame Rate | The frame rate per second for output file |
| Timelapse Scale | For real-time captures a scale can be set to allow for timelapse captures |
| Frame Update Mode | Allows the frame update to be controlled automatically, or manually via scripting. This can be useful when capturing an element that doesn't necessarily update each Unity frame, eg a webcam or custom texture rendering |
| Flip Vertically | Flip the output image vertically (debug only) |
| Video Codecs | |
| Search By Name | Whether or not to search for a codec based on a prioritised list of codec names, or whether to force codec use. On macOS and iOS it is possible to specify the codec directly as they are all generally supported. On Windows it is not always known which codecs are available, so it can be useful to specify a search list. |
| Codec Search Order | Allows you to list the names of codecs to search for. The first codec in the list that it finds installed on the system will be the one used for encoding. This is useful if you are deploying an app to a system you don’t have codec control over so that it can look for a number of codecs before finally falling back to uncompressed. If you want uncompressed simply add a blank entry to the list |
| Force Video Codec Index | Only for Windows, allows you to override the search priority list and select a codec directly by index |
| Encoder Hints | |
| Average Bitrate | Ideal average bitrate of output video |
| Maximum Bitrate | Ideal maximum bitrate of output video |
| Quality | 0..1 range to specify quality preference over other factors (eg encoding speed) |
| Keyframe Interval | The distance between keyframes |
| Support Transparency | Whether or not transparency should be supported if possible |
| Use Hardware Encoding | Whether to prefer to use hardware or software encoding |
| Enable Constant Quality | Enabled constant quality encoding for H264 and HEVC codecs on Apple Silicon devices. Use the Quality slider to choose the desired level of quality (0 - most compression, least quality, 1 - lossless compression, highest quality) |
| Enable Fragmented Writing | Enables fragmented writing of QuickTime (mov, mp4, etc.) files. Enabling this feature allows you to open and play a partially written asset should something unrecoverable occur during the writing process. Adjust Movie Fragment Interval to control the fragment size |
| Movie Fragment Interval | The interval in seconds at which movie fragments should be written, the default is 120 seconds. Making this value too small may result in captures failing |
| Motion Blur | |
| Use Motion Blur | Enables an experimental option which is available for offline rendering. It accumulates frames in between the capture frames to create motion blur. This is very useful for high quality rendering but it is very expensive as it is a brute force approach to motion blur |
| Samples | The number of sub-frames to render which get accumulated into a single output frame |
| Cameras |
Audio
Properties
| Property | Function |
|---|---|
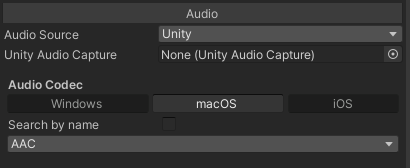
| Audio Source | Specified where to capture audio from, this can be set to None, Unity, Microphone, Manual, or Unity Audio Mixer |
| Unity Audio Source | |
| Unity Audio Capture | The component to use for capturing audio from Unity. This can be CaptureAudioFromAudioListener, CaptureAudioFromAudioRenderer or CaptureAudioFromWwise |
| Microphone Audio Source | |
| Force Audio Device Index | The index of the microphone/recording device to use. Default is zero |
| Manual Audio Source | |
| Sample Rate | The sample rate for manual audio encoding |
| Channels | The number of audio channels for audio audio encoding |
| Audio Codec | |
| Search By Name | Whether or not to search for a codec based on a prioritised list of codec names, or whether to force codec use. On macOS and iOS it is possible to specify the codec directly as they are all generally supported. On Windows it is not always known which codecs are available, so it can be useful to specify a search list. |
| Codec Search Order | Allows you to list the names of codecs to search for. The first codec in the list that it finds installed on the system will be the one used for encoding. This is useful if you are deploying an app to a system you don’t have codec control over so that it can look for a number of codecs before finally falling back to uncompressed. If you want uncompressed simply add a blank entry to the list |
| Force Audio Codec Index | Only for Windows, allows you to override the search priority list and select a codec directly by index |
Post

After the video file has been created, an optional post-process can be run to make addition changes to the file.
Properties
| Property | Function |
|---|---|
| Streamable MP4 | Makes the MP4/MOV file suitable for streaming by using 'fast start' encoding method |
| Stereo Packing | Injects data to specify the stereo format of the video |
| Spherical Layout | Injects data to specify the spherical format of the video |
Misc
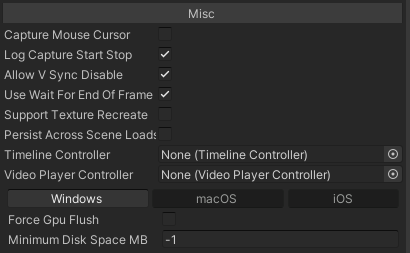
Properties
| Property | Function |
|---|---|
| Capture Mouse Cursor | This option is only available when using the CaptureFromScreen component and allows the mouse cursor to be captured. You have to specify a texture to use for the cursor |
| Log Capture Start Stop | Log each time the capture is started or stopped. Disable this for less garbage generation |
| Allow V-Sync Disable | For off-line capturing, allow vsync to be disabled which allows captures to run as fast as possible |
| Use Wait For End Of Frame | Makes sure capture happens right at the end of the frame - this allows some features such as skinning to be resolved correctly |
| Support Texture Recreation | |
| Persist Across Scene Loads | The GameObject will not be destroyed when the scene is unloaded. |
| Timeline Controller | Optional TimelineController component when capturing Timelines using offline rendering |
| VideoPlayer Controller | Optional component when capturing VideoPlayers using offline rendering (not currently working) |
| Windows Only | |
| Force GPU Flush | Flushing the GPU during each capture results in less latency, but can slow down rendering performance for complex scenes. |
| Minimum Disk Space MB | Set to -1 to ignore, otherwise it will keep checking the disk space and stop the capture if the free disk space gets below this number of MB |
Help
Shows the plugin version number and has links to the website, issue tracker, documentation etc

- The "Start Capture" button will begin capturing. The scene needs to be running.
- The "Browse Last" button will show a Finder/Explorer window with the last capture selected.
- The "View Last Capture" button will play back the last captured video using the system media player.